Showing posts with label Family. Show all posts

Wednesday, June 8, 2011

Word Sister!

We threw caution (and my neurosis) to the wind last night and took our kids swimming until 10:30...pm

Then after the pool, we took them out for hot fudge sundaes. Once you have a 5 and 3 year old up til 10:30, staying up til 11 for some ice cream doesn't really make that much of a difference. But some great memories were made.


not my photo, but this is own community pool

I am incapable of making the news anchor-ish segways to my next topic, but I promise this was semi related.

A repost at a fantastic blog called Gypsy-Momma: You are more than your swim suit

Love it.

Run over check it out!

Friday, June 3, 2011

Ode to Summer

Today was the definition of summer day.

I loved watching this out my window...


Graham is in a baseball phase. The batting helmet is a hand me down from our niece (Thanks Kait) and it is by FAR his favorite accessory....yes my 3 year old son likes to accessorize. 

I got to play around with my (only) willing model. My sweets, Anna.


It doesn't hurt that I bribe her with accessories either! :)

We ate this for dinner while my husband professed his love for another woman. But its ok, because I love her too!


If you ever feel like rocking your family's faces off. Make them this burger. I promise. (Ok, well our kids had the usual fixins but their faces were still rocked off.)

And over dinner we discussed this


and then I got sad thinking that my summers with them are numbered.

So now I wait, for my family to return home from the baseball game so we can enjoy our lemonade cupcakes. 

Thank you Wal Mart bakery for letting me suck at baking but still make great memories!

Monday, May 30, 2011

Herald Introduction

My husband started a new job this week as the campus youth pastor at Orchardville Church (Centralia branch). We got to meet the students last night for our first night of Modified Youth! 

Here is the video we showed by way of introduction to the ridiculousness that is our family!

Friday, March 11, 2011

Butterfly Effect

I may or may not have gone to the thrift store multiple times this week.
I'm on spring break. Thrift stores are my Cancun.

Anyways, I didn't really know what I wanted to do with this $3 baby, but I did know that I always love me a nice chunky frame. And this guy is heavy...remember that for later...


so a quick paint job and some accessorizing, I have a new spot in my bathroom that I absolutely love!


Isn't is cute in its new home above my toilet?

Wednesday night it was not above the toilet
it was hanging by the door (the entire shelf).

Did you know that a bathroom door slammed by a 3 year old can generate enough wind to knock accessories off a floating shelf? 
(Kinda sounds like the "butterfly flaps it wings" thing doesn't it?!?)

Well it does, and 3 year olds are not very good at catching.


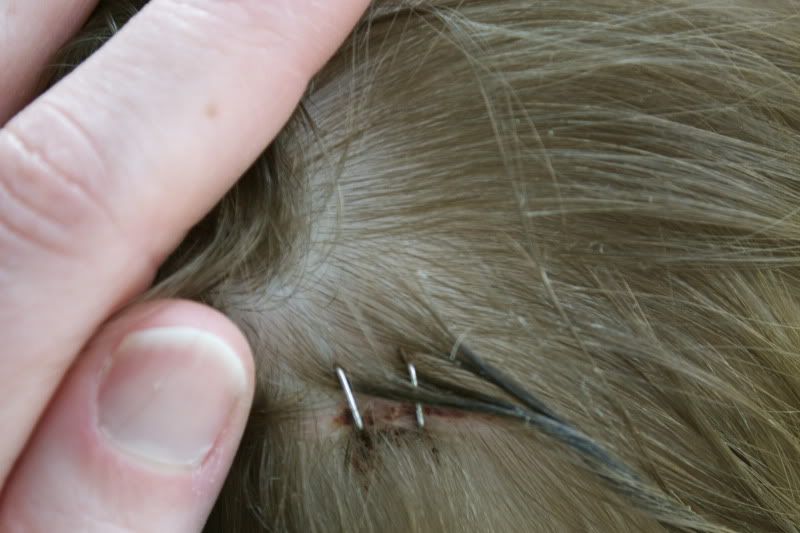
Thats my 3 year old's head. With 2 staples, medical ones....not a DIY project!

So moral of the story is sometimes you have to test drive your decor before you let the natives loose in the room!

Monday, December 27, 2010

Boston Blizzards

While we're still enjoying some time away, I wanted to leave you all with some photos of what was left for us!
Better than a Christmas gift, we got a blizzard.
Big time!

My poor Dad had to work today. Despite the storm.
According to my Boston photos thus far, it looks like I don't have a  Dad.
I promise I do.

Meanwhile
 my hunny was hard at work around my parent's house...


and I was busy trying to convince the kids that it IS fun to play in the snow.

how'm I doing?

Once my Mom instigated a snowball fight with the kids, they were all in.


Monday, September 6, 2010

It's been way THAI long

I haven't felt crafty lately but I have felt homemakerly!  My husband just began the RN program at our community college AND is working weekend midnights at the hospital as a phlebotomist (blood taker) so he is insanely busy.  When he is actually home it is either study time or sleep time!  Dinner is about the only time that we can really connect so I have made a real effort to cook every night for him.

Finding new recipes has been a LOT of fun, and a little disappointing.  Made a lemon chicken the other night that we took one bite of, gave 'the look' to each other, spit it out and I went to the freezer for pizza rolls.  Anyway... I'm finding some really great recipes so I'll be sharing them every once in a while with you.

Today's recipe is actually for Thai Coffee- definitely not a dinner item but who cares?!  We actually had about 17 people over for breakfast this morning since Dave didn't have school today and our church family wanted to see him.  We had pancakes, biscotti, fruit salad, cream cheese braid bread, and LOTS of coffee!  The Thai coffee was a HUGE hit and was one of the first things to go.  So here it is!

Thai Coffee- Serve hot or chilled
4 cups of brewed coffee
1/2 cup sweetened condensed milk
1/4 tsp cinnamon (more to your taste than actually measuring)

Mix it and DRINK UP!  Seriously amazing! (just put in the fridge overnight and stir before serving if you want it cold)

Monday, January 4, 2010

Shillouhette Toss Pillows

I think I've recovered. One week, with three major trips in it is just waaaay to much! But after hiding under the covers for an extra few hours this morning, I'm full of ideas and ready to roll! Jenna is still in ill-ville, so just hang tight and her royal craftiness will be joining us soon!

So I'm not really sure how all those bloggers get away with posting their homemade Christmas gifts BEFORE Christmas. I can't, cause there'd be no surprise with the gift giving (Hi Mom). So here's a little ditty that I whipped up for my parents, and shoved into a box so we could have our U.S. Postal Service Christmas.

I started by taking a profile photo of each of my kids. I printed these ones out 5x7 but you can print them in any size to suit your needs. It really doesn't matter if their eyes are open or not because we're just looking for their shillouhettes.


You'll even be able to see in the next photo that I did a little hair styling when I cut out my daughter's photo. I've seen people flip their photos over, paint the back black and frame it against some white paper. Love that idea, but we're going to take these babies a few steps further.


Next I traced the shillouhettes onto freezer paper and cut them out. (Yes...this stuff is amazing!)


Then I ironed the freezer paper stencil down onto my fabric. It makes a super tight seal, which is perfect for painting!


Now when I painted these, I did not use fabric paint. I just used regular acrylic paint. I wanted to be able to age the painting, to make them look more antiqued. I did however, warn the recipient of the gift not to toss these pillows into the wash. Not entirely sure what would happen, but I'm sure it won't be pretty. So they have to be spot cleaned.

Although...It does look pretty cool just like this too!


The paint dries pretty fast. Which is perfect for notsopatient me. Before the paint has been dried on there forever, but after it doesn't look all....wet (yes, this is a scientific window of time), I took a wet toothbrush to it and just scrubbed away. If I happened to scrub too much off in an area, I'd just dip my wet toothbrush in the paint and scrub some paint back on there.


Then put the toothbrush back in the holder, and your husband will never know the difference.
KIDDING
Doesn't everybody have the old junk toothbrushes in the cleaning cabinet for such a project as this?!

Sew right sides out with a short stitch length and a 1 inch allowance all the way around. That sounded like I speak Singer. I don't. I just made sure the shillouhette was facing out when I sewed the pillow together (unlike a regular pillow that you later turn inside out to sew). You want to make sure the stitches are close enough together so when you fray the edges, the pillow doesn't fall apart. (There is a setting on your machine for that-just don't ask me where...actually, ask Jenna!)

Stuff it, and start pulling the threads to fray the edges of your pillow. I used a fabric that was burlapesque but not burlap. Burlap was too scratchy for me. I believe this was called monks cloth. Or something like that. (Sorry to the naked monk whose cloth I purchased to make a pillow).

And there ya have it!


La-te-dah!


Sunday, December 6, 2009

TV Tile Chart

I'm so excited to show you guys my very first project! We've got lots more coming up, so stay tuned. But for now, here's one that I'm linking up to the Shanty2Chic sister's Rustoleum Revamp Party!


Shanty 2 Chic

After realizing how much television my children watch, and reading (for school) about the correlation between increased TV time and decreased attention spans, I knew we needed some way to give (and take away) TV time. So here's my solution...


The kids start the day each with a tile on the chart
(1 tile=1 show). If they happen to wake up on the wrong side of the bed, the TV is taken away before they even get to eat their Wheaties. Then throughout the day, they can earn another TV show (or have it taken away as punishment)

Ok, I realize that there are enough tiles to amount to like 5 hrs of TV but they don't earn them all in one day (Don't worry Mom!) I made extra incase we lose some!


So here are the steps I used to create our
TV Tile Chart


First, I primed my clipboard with Rustoleum magnetic primer. I put on several coats (ahem....like 5!)


Next I traced the clip board and cut out my paper. (Note that I cut out a square in the bottom paper for the magnets so they would not have to go through 2 layers of paper).


Then I used Mod Podge to adhere my papers to my clip board. Before I put on the center square, I inked it with Tim Holtz Distress Ink. I sanded and inked around the rest of the board, after I had glued the rest of the pieces down.


After I rubbed out all the air bubbles, and let the paper dry, I put several coats of Mod Podge on top of the paper to seal it and keep it from tearing.

Then I embellished! (My favorite part!) For the clip, I made a little sign that said 'TV' using matching paper, stickers, and MORE MOD PODGE!


Then for the top ring I simply looped all different ribbons through the ring, and kept adding til it looked not-so-pathetic.


I debated on just buying plain ol magnets to stick on there, but WHERE'S THE FUN IN THAT!?

So I took some metal charms (a letter for each child's name) and painted and sanded them.


Then I Mod Podged them onto some brown cardstock and (you guessed it...) Mod Podged over them! All I had to do was slap on self-adhesive magnet strip, and we're in business!


What do you think?


Now if I could only make a "remote sharing time chart" for my husband!